I have a few easy steps for you to follow to create a cute Sticky Note Holder! This quick and fun project is perfect for sharing with others as a thoughtful handmade gift—or keeping for yourself to add a little handmade charm to your desk. Follow along and enjoy creating!
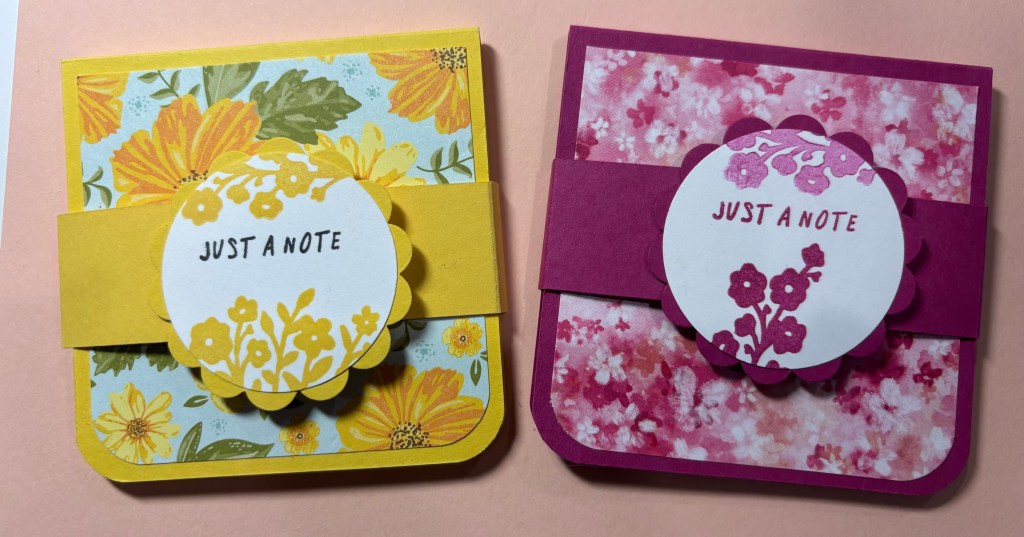
The Sticky Note pad used in this project was purchased from the Dollar Tree store. (The size of the pad matters with the directions below)
Dimensions:
Cardstock base: 6 3/4 x 3 1/4 – score on the 6 3/4 side at 3 1/4 and 3 1/2
Cardstock band: 8 1/2 x 1 – score at 2 1/4, 2 1/2, 5 3/4, 6.
Cardstock Scallop: Use a scrap piece of matching cardstock and the 2″ scalloped punch
Cardstock Sentiment: Use a Basic White scrap and punch a 1 3/4″ circle
DSP: 3 x 3
Instructions:
Use a corner rounder and corner round all 4 sides of the base and 2 sides of the DSP (if your DSP has a pattern be sure you corner round the bottom 2 corners of the DSP)
Adhere the sticky note to the inside of the base using Tear and Tape
Adhere the DSP to the front of the base
Adhere the band to the back of the base using Tear & Tape
Wrap the band around and adhere the scallop to the front flap
Stamp the sentiment to the Basic White circle (I used the August 2025 Paper Pumpkin kit) for the sentiment and flowers
Add use either velcro or magnets and adhere to the back of the scallop piece and to the other portion of the band flap
I hope you like this creation and if you make one post a picture of your creation on my Facebook page – Stamping with MB
Discover more from Stamping With MB
Subscribe to get the latest posts sent to your email.
