
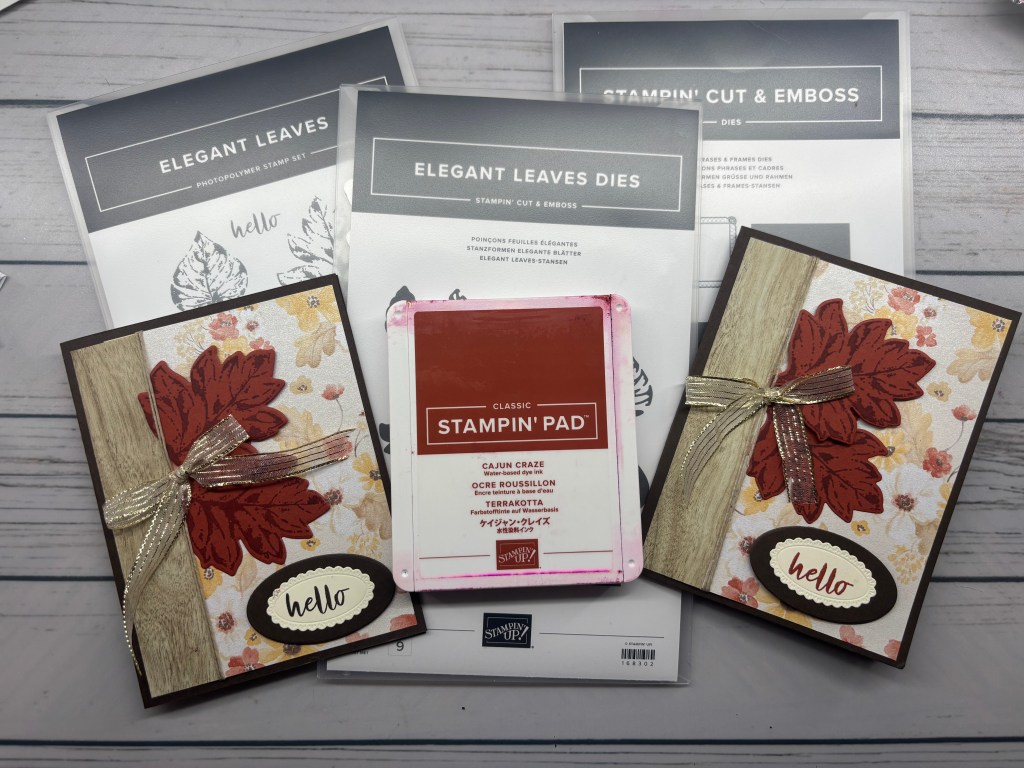
Another Beautiful Fall Card! 🍁
I just couldn’t resist creating another fall card using this gorgeous Designer Series Paper! The colors and delicate shimmer are simply too pretty not to share!
For this card, I combined the Phrases & Frames Dies with the Elegant Leaves Stamp and Die Set to create a beautiful design that’s perfect for the fall season.
And of course, I had to use the stunning Glow of Harvest Specialty Designer Series Paper (#168598), our August Product of the Month! Its soft, subtle shimmer adds just the right amount of sparkle without being overpowering. I just love how it brings the whole card together!
Ready to create one yourself?
I’ve included all the measurements and step-by-step instructions below, so grab your supplies and give it a try!
Supplies:
Early Espresso card stock #119686 – 5 ½ x 8 ½ card base and a scrap for frame
Cajun Craze card stock #129684 – 2 piece of 3 x 3
Glow of Harvest Specialty DSP #168598 – 3 ¼ x 5 ¼
Country Woods DSP #163393* – 1 x 5 ¼
Very Vanilla #166784 – 5 x 3 ¾ (inside for sentiment) and a scrap for the front sentiment
Cajun Craze Ink # 147085
Elegant Leaves Stamp Set #168300**
Elegant Leaves Dies # 168302**
Phrases & Frames Stamp Set #167581***
Phrases & Frames Dies #167586***
Linen Thread #104199 – 11 inches
Gold Striped Mesh Ribbon #165599 – 10 inches
*Product is retired so you could use any wood grain paper you have if you don’t have this specific one
**These are also sold as a bundle 168303
***These are also sold as a bundle Phrases and Frames Bundle #167587
Instructions:
- Create the Designer Series Paper front layer.
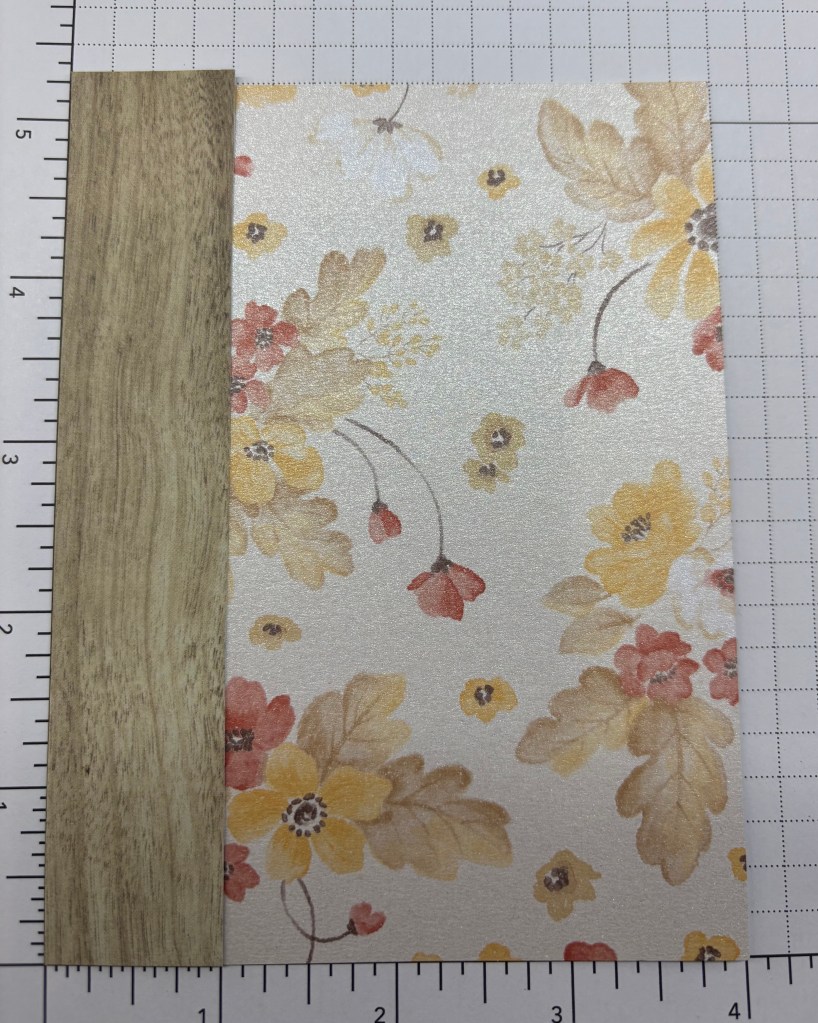
The finished front layer should measure 4″ x 5¼”. To achieve this, you will overlap the two pieces of Designer Series Paper by ¼”
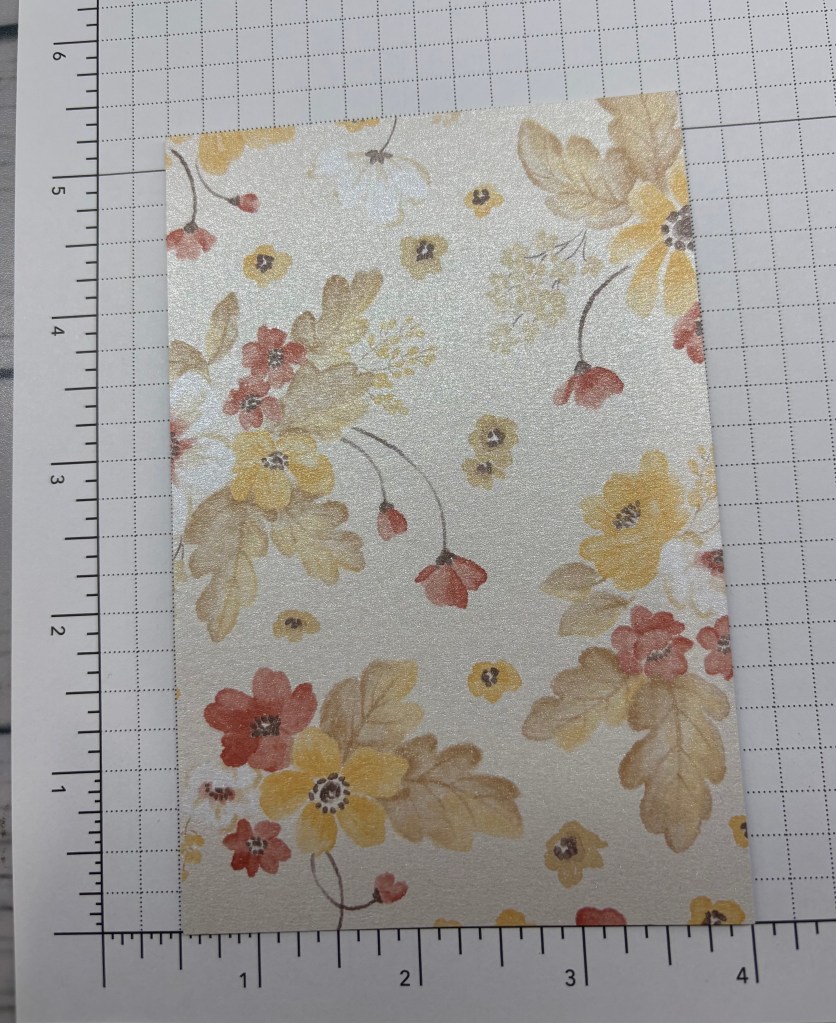
Place your 3¼” x 5¼” Glow of Harvest DSP on a grid sheet, aligning the right edge with the 4″ grid mark
(see picture ‘a’ below) Apply adhesive along the left edge of the Glow of Harvest DSP. Next, place your 1″ x 5¼” Country Woods DSP over the adhesive, aligning its left edge with the ‘0’ grid mark. (see picture ‘b’ below)
Your completed panel should now measure 4″ x 5¼”.
See photos below for placement. - Add the Linen Thread
Wrap Linen Thread around the assembled DSP panel twice (starting from the back of the card) secure the ends on the back of the panel with tape. Adhere the completed panel to the front of the card - Stamp and die-cut the leaves.
Using Cajun Craze ink, stamp two large leaves from the Elegant Leaves Stamp Set onto the 3″ x 3″ Cajun Craze cardstock.
Die-cut both leaves using the coordinating large leaf die from the Elegant Leaves Dies - Create the sentiment.
Using the scrap piece of Very Vanilla cardstock, die-cut using the smallest die from the Phrases & Frames Dies.
Stamp the hello sentiment from the Elegant Leaves Stamp Set onto the Very Vanilla piece. - Layer the sentiment.
Using the Phrases & Frames Dies, cut the smallest rectangle from a scrap of Early Espresso cardstock.
You will only be using the center portion of this die-cut piece.Adhere the stamped Very Vanilla sentiment to the center of the Early Espresso piece. Add Stampin’ Dimensionals to the back and attach the layered sentiment toward the bottom of your card, as shown in the photo. - Arrange the leaves.
Trim the stems from both die-cut leaves. Adhere the first leaf directly to the card front using adhesive.
Add Stampin’ Dimensionals to the back of the second leaf and position it so that it partially overlaps the first leaf.
Refer to the finished card photo for placement. - Add the finishing touch!
Tie a small bow using Gold Striped Ribbon and attach it with a Mini Glue Dot where the two leaves overlap.
Your beautiful fall card is complete! 🍁
I hope you’ll give this design a try. It’s a wonderful way to showcase your favorite Designer Series Paper and add a little fall elegance to someone’s day!
Happy Stamping!
Creating the front layer step ‘a’ and step ‘b’ .
Discover more from Stamping With MB
Subscribe to get the latest posts sent to your email.
